Monday, July 26, 2010

~ Blue Bedroom Inspiration


What a week. I haven't been this dirty every single day in a long time. Or this tired. We've been digging and planting, digging and planting for days. After several trips for plants, more plants, mulch and sod, the backyard is looking better. I just have to remember that it's a big job, and it can't be done in a week. Or even in a month, or two.

One thing for sure, you appreciate a nice comfortable bed at the end of long day of digging. And if it's in a beautiful room, it is even better.

Nothing new happening inside these days. And the bedroom is way down the list of things to do. However, these pictures just popped up from my old files. Thought I'd share them.


I might not be much a blue person, but this bedroom really draws me to it. There are things I'd change, but the feeling is so soothing, even though there is not blue bedroom in my future.

As with most showhouse rooms, this one doesn't actually look lived in. But the architecture and colors are still nice inspiration.

See Y'All Soon~
Donna

Monday, July 19, 2010

~ Dining Chair Upholstery How-To Part 2... The Top Front


There are two different ways that I did the front top of the chairs even though they were all cane backs. The ones that came from the thrift store in the last post were so cheap that it didn't matter if I stapled or glued the fabric and trim to them. On the other hand, I did not want to do anything that could damage the wood or cane of dining rooms chairs, or be too difficult to remove later on. So they did take a little longer to do.

For the black and antique white chairs, I made the template to the size of the back, cut the fabric, fit it to the back and used a staple gun to attach the fabric to the front of the chair. You will use the same wood on the inside of the cane that I showed you in the last post, and here.


After that you can hot glue or fabric glue the trim in place to cover the staples or brads holding the fabric. Really easy!


But for the dining room chairs I needed something different. These chairs have been changed over a dozen times through the years. Sometimes with splurge fabrics or just as often with a sale or bargain fabric. This time I found a fabric I loved that was already quilted. I knew it would stay for a longer period of time. But it still couldn't be permanent nor did I want to harm the wood of the chairs. My disclaimer is this, pros who do upholstery for a living probably do not do it this way. But it was perfect for me!


Since the fabric was quilted I did not need to add a layer of batting as I would have done with either method to give the fabric some cushion and body. After I cut and played with the fabric until it fit the inset area perfectly allowing an inch all around, I turned the edges and stitched around them.

The I taped the fabric gently to the front and I carefully sewed the piece on to the cane by taking tiny stitches to from the front which would not show to a more wide and probably messier look to the back. It was covered up with the fabric as I showed in the last post so it didn't matter what it looked like on the back. This is made easier by the fact that the cane has the holes in it of course.


Hope you all have a great weekend,
~ See Y'All Soon

Monday, July 12, 2010

~ Dining Chair Upholstery How-To ...The Backside of A Good Chair Tale


After the last post about the 2 twin chairs, I got questions and emails about how to do the finishing upholstery work on them. Although I am not an expert at upholstering furniture here are some tricks I've learned along the way.

This post is for the back, I'll be back with a shorter one for the front.

I started with a nice, older Thomasville cane back chair. A much better version of the ones in the last post. But they are all made in a similar way and can be covered to update, change or to cover up in the case of the really cheapy ones. This one I've had since it was new in 1986 as part of a set. I still love them, the pecan wood is beautiful. I would not paint them, but I've changed the fabric a few dozen times. The lime green and brown toile that is on them now is still one of my favorite fabrics.

When you look closely, you will see that the cane is on the front and then there is a piece of wood holding it in place from the back. Turn the chair around and look at the back and you will see the the cane is snuggly inside that area you just looked at on the front.


This is the view from the back. Gently push the cane away from you. See, there is a tiny space.That is where the fabric goes. You have about a half inch of room. So you do need to cut it pretty close, but this isn't that hard at all.

Start with a larger piece of paper at least the size of the back of the chair in order to make a template. I've used newspaper in a pinch, but be careful of the ink getting on your hands and then getting on your fabric.

Lay this piece of the paper that you cut about the size of the opening plus a few inches, against the back of the chair and draw a template for the area of back of the chair where the cane shows through. Use a pencil to draw along the edge as your press the paper against the chair. Try to make it the exact size of the opening. Cut it out, try it on for size, and if it's not quite right just start over again, it's only paper!

TIP: After you have your drawing, be sure to mark the template FRONT as the SIDE FACING YOU as you draw, and mark Left & Right. The opening will be a different from side to side. And you may want to center a pattern. The front will be the front side of the fabric.

Now take the perfect fitting template and make a new one by using a ruler and just mark line or dashes around it, about 1/2 inch larger. Connect your dashes and cut it out.

After you see that the fabric is the perfect size, cut a piece of fabric to test. You can make the test piece out of cheap fabric like an old sheet or muslin. You want to make sure that it really is perfect before cutting your actual fabric.

Lay the test piece against the chair back and center it so that it is the fabric is 1/2 inch past the inset area on all sides. Tuck in a little on each side to make sure you don't have too much excess fabric, then remove. Cut the actual fabric now using the the paper template that you have adjusting if needed after seeing how the test piece fits.


Now, gently push the fabric into the area between the cane and the back of the chair, with a blunt tool. A butter knife from your eating utensils works well, or a large flat head screwdriver.

Your are "stretching" this piece, which means that you start at the middle of on side and go to the middle of the opposite side, and then the middle top and middle bottom. Back to the beginning side, tuck and go to the opposite side. Then you work your way in a little a time 3 or 4 tucks then go the opposite side. This will keep the fabric centered, too.

The fronts of these chairs were done differently than the thrift stores ones, but I'll show you both ways in the next post.

~ Happy Friday!
See Y'All Soon
___________________________

{ALL ART WORK AND TEXT IS COPYRIGHTED
© DONNA COURTNEY, THE DECORATED HOUSE}

Friday, July 2, 2010

~ Bedroom Color Inspiration, Tale of Two Chairs

I so enjoyed hearing what you liked about the bedrooms in the previous post!

Even though I'm not really redoing the bedroom right now....

It was so interesting to hear what you liked about the bedrooms in the previous post!

None the less I'm thinking about the possibilities. The fact that I spent a little bit of cash on the silk fabric for the drapery isn't enough to stop me from changing them out. I might be able to use them at Sweet Daughter's house anyway. But I totally forget I have the perfect Oriental rug that goes so well with the golds. I bet I can find another room for it. :)

This got me looking to see if I had anything left from my fabric stash that I had not given away. I still have the fabric from the chair I had redone for this room several years ago.
So some of this post is revisiting the "Tale Of Two Chairs" while I contemplate if I would get tired of a fabric I had used before......
_________________________________________________

Isn't it fascinating when you see twins how they can start out life looking so identical but then as they age, each one takes on a different personality and appearance.

This is exactly what happen happen to our twins, the Chair Girls. It also could have been titled the "Ugly Duckling" but neither of them wish to be compared to a duck and didn't understand that the ugly duckling turned into a swan. Oh well.

Wandering into this thrift store is not one of my favorite things. And even though I've complained about such trips, I have to admit I have saved a few forlorn little gems from this place. So through the crowds of women checking out the clothing I go, all the way to the back. I really wanted just a cheap chair.

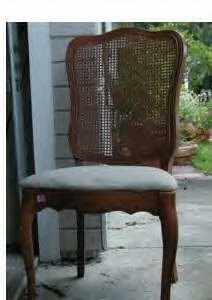
And what do I see, oh a set of uglies! They were French inspired, but they were "inexpensive" to began with and had truly seen better days. In the photo , you can see there was work to be done even before I would let this one out of the garage.

I only needed one is what I thought at the time. I kindly paid them the price of $20 that they had marked for all 3 chairs, and told them to just keep the other two and took the best one and put it in the car. Then I thought better of my decision and decided maybe down the road I could fix the second one as well. The third, sorry there was no hope for it.

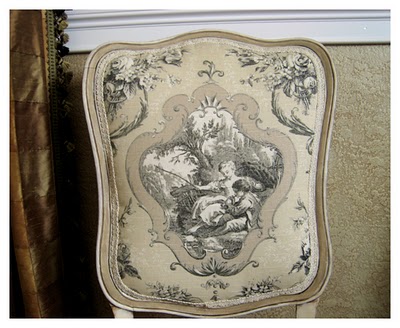
The first one was painted creamy white with accents of the taupe color that I used in the master bedroom. It was also aged and antiqued with a glaze of raw umber. There was a lot of work with a small artist's brush. It makes a huge difference in your finished piece if you can do this when there is some carving to play with.


The second chair was done in black. I had a lot of black in the house at that time. These were my two different loves, light furniture and black. Both were recovered in medallion toile fabrics and with different kinds of trim.

When I last wrote about these, I had intended to redo the lighter chair and keep the black on as it was. My decorating has changed quite a bit since then. I have very little black pieces and have plans to paint most of them.

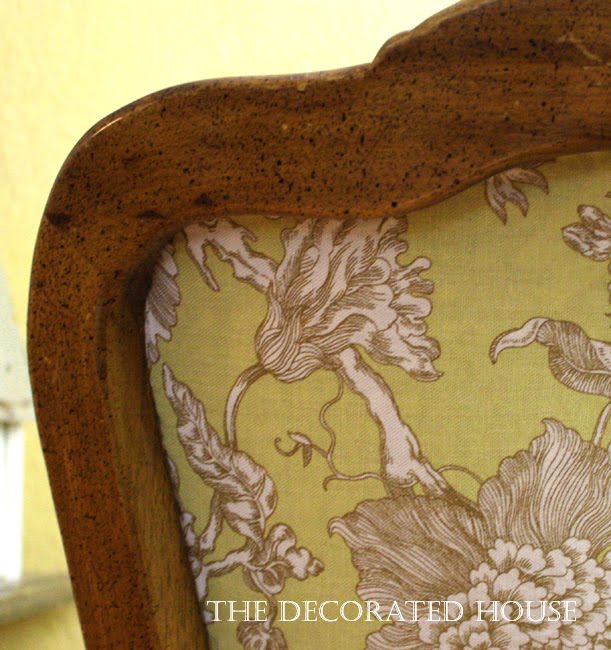
In the close ups, you can see some of the ways the chairs became transformed. Light sanding on the black one showing the wood along edges.

I always use Krylon Satin spray paint. I've found that it is the best for me.
The one that says dries in 12 mins. or something like that. Great paint.


The lighter colored chair got the opposite treatment of adding the darker colors in the deeper areas for aging, and the taupe color was added to the flat area on the back.

So the fun thing is that now I'm in love with the colors of this chair all over again! Hey we can change our minds, can't we? It sure feels better when it's just a thrift shop chair to change out though.

~Wishing you all a Happy Weekend!

See Y'All Soon~

______________________________

{ALL ART WORK AND TEXT IS COPYRIGHTED
© DONNA COURTNEY, THE DECORATED HOUSE}