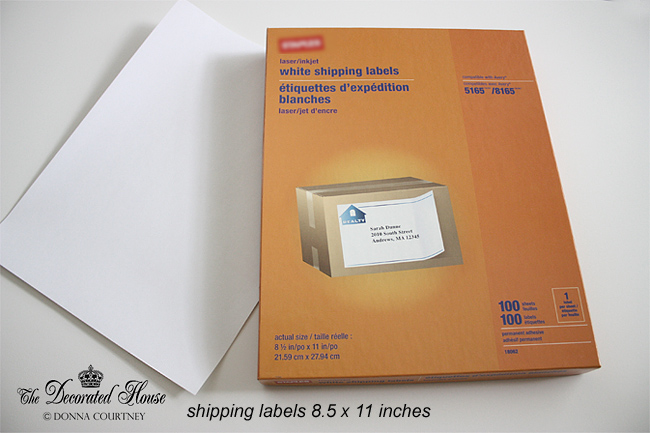
So why are we using the shipping label?
Good question, and if I don't answer that first
this could be confusing!
You can't print on fabric from you printer because the fabric is
so flimsy. It will jam in the printer for sure.
So you are using the label to make it possible
to get the fabric through the printer.
All backing and paper will be removed
after you are done printing and
you will have lovely piece of art
printed on fabric!!
____________________________________________
Forget the spay glue adhesive and freezer paper. This is much better.
It is very easy to do and requires no messy chemicals to transfer your image to fabric.
This tutorial will show you how to use your inkjet printer at home.
(I have read that others used their laser printers for fabric,
but I have not tried it, so I cannot say how it works from my
own experience.)
(I have read that others used their laser printers for fabric,
but I have not tried it, so I cannot say how it works from my
own experience.)
** All art in this tutorial is the original, copyrighted
The secret to making this technique so simple is the use of large shipping labels.
They come in 8.5 x 11 inches sheets with adhesive on the back.
You can easily find them at any office supply store
and some other stores as well.
They are cheaper per sheet if you purchase a box of 100,
but you can find smaller boxes too.
Choose your fabric. This should be something like a cotton or cotton blend.
The fabric here is a medium weight unbleached cotton.
The first picture above is a white linen.
1. Cut a piece of fabric about 3 inches larger than the
8.5 x 11 label leaving a 1 to 1.5 inch area around the entire piece.
(The piece I used for that picture has not been ironed yet,
but be sure to iron your fabric if it has any wrinkles at all.)
As you can see here, there is a place on the back, in the center, for you
to take the backing off the sticky label.
2. Take the backing off the label
and center it, sticky side down,
on the BACK of the fabric.
3. Press firmly along the edge of the label.
You want to make sure that you get the best bond
between the fabric and the label as possible.
4. Next cut the fabric around the label.
Cut as close to the label as you can.
OR
Cut slightly into the label.
This will give you an even better seal.
It will be less likely that you will have loose threads from
the fabric going into your printer if you
the fabric going into your printer if you
cut into the label slightly.
(Tip: If you can sharpen your scissors before doing this step this is
a very good idea.)
5. Load the label/fabric into your printer
so that the fabric side will be printed on!
Each printer is different, so
if you can't remember, test on plain paper first.
Guide the fabric in as it begins to print.
This will help keep it from catching, and will load
more smoothly.
6. To "heat set" the ink, you
can iron your fabric after it is printed.
Lay a plain piece of fabric on top
and just iron it after you
remove the label from the back.
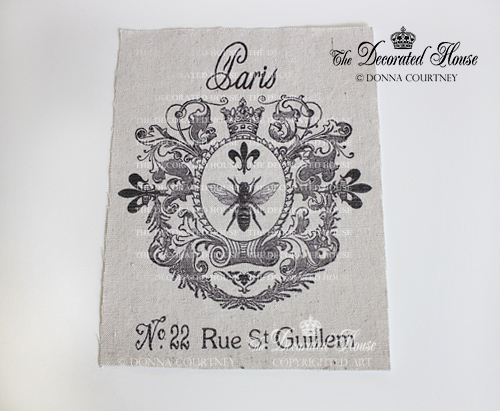
The above picture is what it will look like
after you print your fabric.
That fabric unbleached cotton and
printed on an Epson printer, 8.5 x 11 inches.
printed on an Epson printer, 8.5 x 11 inches.
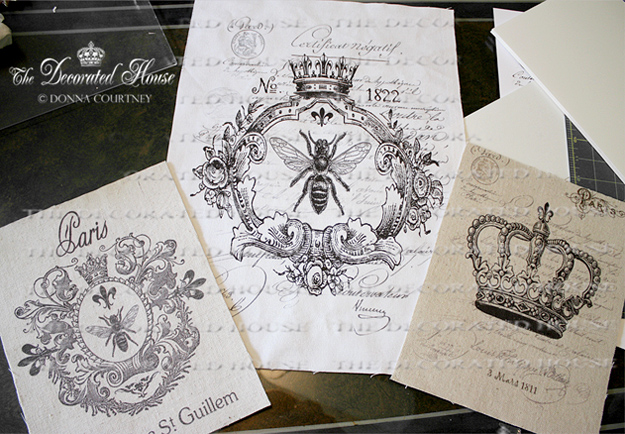
Both of the smaller art fabrics are 8.5 x 11 inches using one full label sheet.
They are both on unbleached cotton of slightly different weights and colors.
The larger one, in the center, is using TWO labels.
It is printed on white cotton linen.
It is printed on white cotton linen.
It is 19 x 13 inches,
and was printed on a large format Epson printer.
7. For Larger than 8.5 x 11 inches,
How to make a larger size if you have a large format printer:
How to make a larger size if you have a large format printer:
You can print up to whatever size your printer will allow
by using more than one label.
Cut out your fabric again slightly larger than the size
you will be printing.
Lay the labels on the back of the fabric, covering the size you
want your final fabric piece.
want your final fabric piece.
Then cut around the label and fabric,
*Disclaimer: About Printers: Although I have used my large format printer which is a little bit more expensive printer to do this, there is a chance that if you use your printer with certain fabrics it may cause harm if any threads come off inside of it. If your printer can print on fabric transfer paper, then it should print using this method. Just be sure to trim off any loose ends/threads before inserting the fabric into the printer.
You can use your fabric piece now for
pillows, bags, art and dozens of things
that you can think up to create!
Have fun!
See Y'All Soon~
................................................................................
Click on any of the pictures below to shop art from The Decorated House
Click on any of the pictures below to shop art from The Decorated House


Very nice! I've printed on fabric before, but using a shipping label is so smart. I've used that awful spray glue that gets everywhere. Great graphics!
ReplyDeleteI am going to try this, Donna! I do have these shipping labels already on hand and some Osnaberg fabric that will probably work. I'll let you know how it turns out! : ) Thanks for the tutorial!
ReplyDeleteGreat tutorial Donna! Thanx for sharing. What do you suggest putting on the fabric so that the ink won't run if it happens to get wet?
ReplyDeleteYes, this is so much better than the spray glue Pam. You will love this method.
ReplyDeleteKathy, since you have the paper, some art, and the fabric, I know you will be doing this very soon! Be sure to let me know so I can see it too.
Pam, if I were really concerned about moisture for where this fabric would be used, I'd first try to use a printer like my Espon that the inks are more moisture resistant. Also, you could use a matte gel medium over the design. Just be sure to test the inks from YOUR printer to see if they will bleed. Most won't but the testing will let you know for sure.
Thanks for stopping by!
I love this idea! I'm going to give it a try to create some labels to put on totes that I make.
ReplyDeleteThanks, Donna!
Many thanks for sharing such a great idea & awesome tutorial! Adding this to my plans this weekend! Blessings!
ReplyDeleteDonna, I can't thank you enough for sharing this! I don't have a laser printer and haven't figured out an easy way, without that glue stuff. I will be trying this!
ReplyDeletexo
Pat
Donna- You have NO idea how timely this is for me!!!! I am getting ready to have a French themed birthday party for my 10 year old gd and I was wondering how I was going to get some images on fabric that I want to use. When I post the pictures I will give a link back to this post- THANK YOU!!!! xo Diana
ReplyDeleteHi Donna,
ReplyDeleteThanks for the tips! I love this project and already have an idea in mind. I have always wondered how others print directly on the fabric. I have used iron on transfer sheets in the past and wished I could learn how to print right on the fabric. I am bookmarking this post for future reference.
Thanks so much for this tutorial. Love it. Can you tell us where you got the bee images. Was it Graphic Fairy?
ReplyDeleteThanks,
DianeD
MA
I know you will be so happy when you see how easy this method is! And the image is as good as your printer. No worry about part of it transferring and some of it not working.
ReplyDeleteThanks for taking a moment to leave a little note. :)
Diane, the bee art shown here was created by me.
ReplyDeleteBut someone sent me a note saying that Karen does have some bee graphics on her site that they were going to use for trying out this technique.
It would be a fun place to start looking.
This is so great! Love how easy it is. I only have a laser printer. Ever tried that?
ReplyDeleteNancy
Powellbrowerhome.com
Brilliant! Thank you Donna! Must try!
ReplyDeleteMonica
Nancy this will work on a laser printer as well. I only stated an inkjet because other transfer methods require a laser printer and will not work with the inkjet.
ReplyDeleteYou will get a great image with your laser.
Hi Monica~ I know you will be creating something fabulous when you try this!
Thanks again for coming by everyone!
Great idea! I've used the sticky back paper from something, not sure if it was labels but I think it may have been fabric sold for printers. Can't find it again so I'm going to try this.
ReplyDeletejust found your blog....Very Nice. New follower.
ReplyDeleteThanks Donna for this great tutorial... I will be trying this out! Love your blog and that you really have a great mix of interests to keep me on here forever! xx Pam
ReplyDeleteI tried it, wonderful, thank you so much!!
ReplyDeleteXO, JUlia
I was just browsing your blog and came across this post. Love this idea! I am in the middle of redesigning my master bedroom and have been looking for an easy way to transfer images to fabric so I can make custom pillows. I am also going to try this method for some pillows for my shop. I have some great old beachy images. Maybe this would this work on adhesive contact paper instead of the labels? I have a bunch of that already on hand. Might try this first.
ReplyDeleteLisa
I have done this many times before even with color ink but instead of buying the labels, just spray a paper with spray adhesive and stick the fabric to it. Works the same way. Thanks for such a good tutorial.
ReplyDeleteHi Terry,
ReplyDeleteYes, I've used the spray adhesive many times. I have to say I love the labels because they are less messy. But in a pinch, I'd spray away.
This is a great idea! I kind of want to try a mixed-media image that's first printed and then partly embroidered over. What have you done with the ones you've made?
ReplyDeleteSome of my friends over at Kollabora, the crafting and DIY community, spend a lot of time looking for new ways to put images on fabric. One of them has a vast collection of T-shirts he's stenciled. I think they'd love it if you posted a picture of one of these projects on the site!
I love this idea and can't wait to try it. I've been having so much fun jumping around your blog this morning and am happy to be your newest follower via email (I am not a Google+ member). Thank you for sharing Donna and blessings to you, Patti@OldThingsNew
ReplyDeleteDonna--you saved the day! I handprinted on fabric a "dedication" for the back of a quilted wall hanging I made but it looked so amateurish compared to the rest of the quilt. I thought of computer printing on fabric but didn't have time to have it done or order special paper. I came upon your tutorial and it worked perfectly. Thank you so much for sharing.
ReplyDeleteI do have one question, though...you mention in one of your comments that this process will work on laser printers also. Don't they get too hot for the fabric? I was afraid to try it.
Hi Janet,
ReplyDeleteI am so happy to hear that you tried this and how well it came out for you. I love how wonderful the image is, just like a printed piece.
Since I have not used a laser for this method, I changed the wording to say that. But I have read a few times that people have put fabric in their laser printers as well.
Thanks for taking the time to leave your note. I love knowing that the posts are helpful to others!
Just a query, do you take the label paper off after printing? You can tell I'm new to this :-)
ReplyDeleteHello Wendy, Look at the pictures in the post and at the 4th picture down, which is step #2, you will see that you take the sticky backing off the paper so you can adhere it to the fabric before you print on it.
DeleteGood Luck, and have fun!
Donna
Thanks Donna, I was getting confused over after the printing whether the paper is left on, but you mention after ironing it you remove the paper (step 6), its a brilliant way of printing on fabric.
DeleteHi Wendy, I added a little more in the directions to try and make it as clear as possible. I can see without have done it already, it can seem a bit hard to see until you do it. Donna
ReplyDeleteThanks Donna, I've since tried it and its brilliant, thanks so much for your help on this. Wendy
ReplyDelete